How to identify RAID components
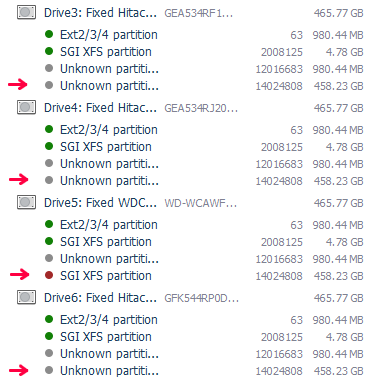
When disks are removed from the NAS and connected to a PC, they will be displayed in the software like this:

Arrows in the picture indicate the largest (the "data") partitions of each disk. For most NASes, these "data" partitions are the RAID components and to build a RAID manually, these partitions, not entire disks have to be added to the RAID builder as RAID components.
To build a RAID manually, the following parameters are required::
- The set of RAID components;
- The offset of RAID components;
- The correct order of RAID components;
- The RAID level (configuration and redundancy type);
- The stripe size for RAID with "stripes";
- Layout configuration.
The Set of RAID components
Usually each disk from a NAS supplies one and only one component for a RAID. Usually this is the "data" partition of each disk (see above). So, to build a RAID you must add the data partition of each disk to a RAID. If some disk from the RAID is missing, it must be replaced with a "virtual placeholder" component to tell the software that the component existed and must be reconstructed from redundancy.
The Offset of RAID components
Typically, offsets of data partitions are the same on each NAS disk (for the example above it is 14024808 sectors). If this offset is different, there is high probability of either partition metadata damage or extra metadata on the RAID component. It's advised to apply the following rules:
- If the partition schema on each disk (or on most disks) is the same, the valid data partition offset must be considered as the smallest offset of the largest partition from the entire set;
- If partitions on some disk look different from other disks in the set, this partition layout must be ignored, and the partition offset should be used from most of disks.
You may add RAID components with valid and invalid offsets, then select a component with the valid offset in the list, click "Edit component range", put a checkbox on "Apply to all components" and press "Set" to align other components using this one as the pattern.
The correct order of RAID components
If this information is not known, it can be recovered manually or might be guessed. In the example above, Drive5 contains red "SGI XFS" indication on its data partition that means there is the start of the file system. This indicates this disk is first in the set. Other disks can be either analyzed for the right order or be tried with a different order.
Our software builds a RAID quite fast and does not modify any on-disk information while building a RAID, so even in case the RAID drives order is not known, it is possible to try all possible combinations, such as "Drive5", "Drive3", "Drive4", "Drive6", then "Drive5", "Drive3", "Drive6", "Drive4", then "Drive5", "Drive4", "Drive3", "Drive6", then "Drive5", "Drive4", "Drive6", "Drive3", then "Drive5", "Drive6", "Drive4", "Drive3" and finally "Drive5", "Drive6", "Drive3", "Drive4" (so there are only 6 options for a 4-disk RAID, taking into account that the first component is known).
RAID level
If the NAS has used the default factory configuration, it is advised to revise NAS documentation to find what its default configuration is. Usually it is RAID1 (mirror) for double-disk NASes and RAID5 or RAID6 for NASes with 4 disks and more.
If the NAS was re-configured, it is required to remember what the configured RAID was.
Stripe size
The typical stripe size for most NASes is 64KB (the default one for the RAID builder dialog). However, some NASes use a bigger stripe size with bigger disks (e.g. Buffalo may use the 512KB stripe size for disks with the size over 2TB).
Layout configuration
The "layout" is applicable to RAID5 and RAID6 and refers to the data/parity rotation algorithm. Most known NASes (with minor exceptions) use the classic "Left Symmetric" data/parity rotation which is the default for the RAID builder dialog of our software.
When all parameters are configured, build a RAID with our software and revise the result. To do this, open the file system on the RAID and check if the files are valid using an embedded viewer (it makes sense to analyze only files with the size larger than the stripe size multiplied by the number of disks). If the file system cannot be recognized, read or the files appear to be bad, the possible reason is incorrect RAID configuration. In this case the RAID has to be "edited" and corrected.
If nothing helps, it is always possible to request our remote data recovery/assistance services.